Simple
Electromagnet
(Basic
Electromagnetism Experiments and Project)
|
Introduction:
An electromagnet is a
device that becomes magnet when connected to electricity. Unlike permanent
magnets, you can easily turn on or off the magnetic force in an
electromagnet. The simplest form of an electromagnet is a metal
rod (such as an iron nail) that you wrap some insulated wire on
that. Electromagnets are used to make electrical bells, speakers,
microphones, electrical valves, electrical door openers, electric
motors, buzzers, vibrators, magnetic cranes, televisions, magnetic
storage device, tape recorders and many more. |
 |
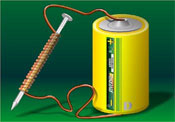
Continue to read and learn how you can
make an electromagnet and what factors affect the strength of an
electromagnet. Your electromagnet will have a core of iron nail and a
coil of magnet wire. |
Experiment 1: Make
a simple electromagnet
In this experiment you
will make a simple electromagnet and then use a compass to
identify the north and south poles of your electromagnet.
Materials:
Materials for this experiment
include:
- Large Iron nail (such as 10d
3")
- 30 feet magnet wire 28 AWG
- Double C Battery holder
- Metal strip (used as key)
- 3 screws
- Piece of wood to install the
the key
|
 |
Procedure:
- Wrap one or two layers of
masking tape on the nail to protect the wires from direct
contact with nail. This nail will be the core of your
electromagnet.
- Leave one foot of the magnet
wire and then start to wrap the wire over the masking tape on
the nail. This will be the coil of your electromagnet.
Continue wrapping the wire until about one foot wire remains
unwrapped. You may optionally twist the two remaining wires
from near the nail to prevent the coil from getting unwind.
(Count the number of turns of wire when winding. Record the
number of turns of wire.)
- Use a piece of sand paper to
scrub away the insulation from about 1 inch of the wire ends.
You will notice a color change where the insulation is
removed.
|
 |
- Mark 3 contact points on a wooden
board and label them A, B and C. These points are 3.5 cm (1.5
inches) apart from each other. You will later insert one screw in
each of the marked point.
- Connect one wire of the coil to the
red wire of the battery holder. (You can twist the wire ends to each
other and then secure it by wrapping a tape over that. Another way
to secure this connection is placing it under the cap of a screw you
insert in a wooden board. That connection is marked as C in the
above diagram.)
- Connect the other wire of the coil
to a screw B you insert on a board. This screw is also the contact
for your key/ switch.
- Pass a screw through the hole of
small metal strip and then insert it in the position A in a way that
the other end of metal strip stays over the screw B, but not
touching it.
- Connect
the black wire of the battery holder to the screw A.
- Insert the batteries in the battery
holder. Your electromagnet is ready now.
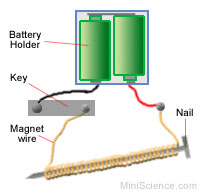
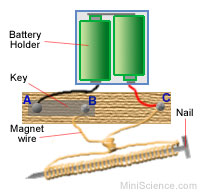
Note: The diagram above shows
the electromagnet nail is very close to the key and battery. Since you
leave one foot wire from each end of the coil wire, your actual
electromagnet will be about one foot away from the key and the battery
holder. This distance is especially important for other experiments you
will perform with your electromagnet.
|
Test your electromagnet:
Place a compass near the electromagnet
and push the button over the screw B. Does the compass needle move? If
it does not, there is a problem. Check all the contacts and try again.
If it moves, you can continue with other experiments. |
Experiment 2:
Identify
the poles of an electromagnet
Introduction: Identifying the
poles of an electromagnet is important because the poles have opposite
forces.
Procedure:
Place the electromagnet near the
compass in a way that the tip if the nail is toward the compass. Push
the button so the nail will become magnetized. The compass needle will
move. If the north seeking end of the compass is facing the nail, then
mark the tip of the nail with the letter N as north. If the
south seeking end of the compass is facing the nail, then mark the tip
of the nail with the letter S as south.
The other end of the nail (the cap)
must be the opposite pole; however, you must verify this. Turn your
electromagnet 180 degrees so the cap of the nail will face the compass.
Press the key again to magnetize the nail. If the north seeking end of
the compass is facing the nail, then mark the cap of the nail with the
letter N as north. If the south seeking end of the compass
is facing the nail, then mark the cap of the nail with the letter S
as south.
Marking may be done by small stickers,
by paint or by color papers. Usually color red is for north and color
blue is for south; however, this is not a standard.
|
Experiment
3:
Does the direction of winding coil affect
the position of the poles? Introduction:
............ (We are adding this new experiment
now. Please come back to this page later for more updates.)
Procedure:
- ...............
|
Experiment
4:
Does the direction of electricity
affect the position of the poles?
Introduction: ............(We
are adding this new experiment now. Please come back to this page later
for more updates.)
Procedure:
- ............
|
More
Than 10 Projects in One Kit
The advanced and standard
electromagnetism kits provide you with the opportunity of doing
more than 10 different experiments and projects related to
magnetism and electromagnetism. If you do not have the kit, please
order it now.
Order
Now |
 |
|
|